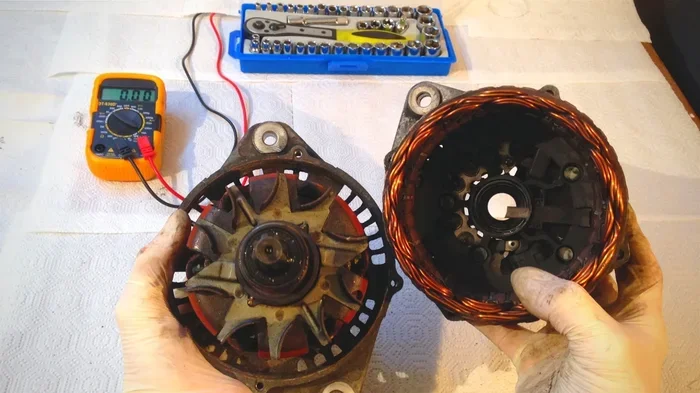
Can You Rebuild an Alternator at Home and Save Money
Yes, you can rebuild an alternator at home and save hundreds of dollars on car repairs. With the right tools, a rebuild kit, and basic mechanical knowledge, most car owners can handle this DIY project in an afternoon. This guide walks you through every step, from spotting alternator symptoms to testing your finished work.
Your car’s alternator keeps the battery charged and powers all the electrical systems while you drive. When it starts to fail, you notice dim lights, a dead battery, or that annoying battery warning light on your dashboard. Most people rush to the mechanic and pay hundreds of dollars for a replacement. But here is the thing — you can rebuild an alternator at home and save a ton of money in the process.
Rebuilding an alternator is not as scary as it sounds. With a few basic tools, a rebuild kit, and this step-by-step guide, you can bring a tired alternator back to life. Whether you are a weekend DIYer or someone who has never turned a wrench, this guide makes it simple. Let us dive into how to rebuild an alternator and keep more cash in your pocket.
Before we get into the nitty-gritty, let us talk about why this matters. A new alternator can cost anywhere from $300 to $800 or more, depending on your vehicle. A rebuild kit? Usually between $20 and $60. That is a massive savings. And the best part? You learn how your car works, which makes you a smarter car owner. So let us get into it.
Key Takeaways
- Save Money: Rebuilding your alternator at home can cut costs by up to 70% compared to buying a new unit or paying a mechanic.
- Basic Skills Needed: You don’t need to be a professional — just patience, basic tools, and a willingness to learn.
- Right Parts Matter: Using a quality rebuild kit and OEM-spec components ensures your alternator lasts for years.
- Safety First: Always disconnect the battery and work in a well-ventilated area to avoid electrical shocks or injuries.
- Know When to Stop: Some alternator damage is too severe for a home rebuild, and that is okay — calling a pro saves time and risk.
- Test Before Reinstalling: Always test your rebuilt alternator before putting it back in the car to avoid repeat trips.
📑 Table of Contents
- Understanding Your Car Alternator
- Signs Your Alternator Needs Rebuilding
- Tools and Supplies You Will Need
- Step-by-Step Alternator Rebuild Process
- Common Mistakes to Avoid During an Alternator Rebuild
- When to Call a Professional Instead
- How Much Can You Really Save?
- Maintenance Tips to Extend Alternator Life
- Final Thoughts on Rebuilding Your Alternator at Home
Understanding Your Car Alternator
To rebuild an alternator, you first need to understand what it does and how it works. The alternator converts mechanical energy from your engine into electrical energy. It charges the battery and powers everything from your headlights to your radio while the engine runs.
How Does an Alternator Work?
Inside the alternator, you have a rotor that spins and a stator that stays still. The spinning rotor creates a magnetic field, which generates electricity in the stator coils. A voltage regulator controls the output to make sure you get the right amount of power. Simple, right? Well, the parts inside are small and precise, but the concept is straightforward.
Most car owners never think about their alternator until something goes wrong. That is a mistake. Understanding the basics helps you troubleshoot problems faster. If you want to learn more about other common car electrical questions, check out can you start a keyless car with a key for related electrical insights.
Key Components of an Alternator
Here are the main parts you will encounter during an alternator rebuild:
- Rotor: The spinning part that creates the magnetic field.
- Stator: The stationary part where electricity is generated.
- Voltage Regulator: Controls the electrical output.
- Brush Assembly: Transfers current to the rotor.
- Diodes: Convert AC to DC power.
- Bearings: Allow the rotor to spin smoothly.
- Serpentine Belt Pulley: Connects the alternator to the engine.
Knowing these parts helps you understand what goes wrong and what needs replacing during a rebuild. Most rebuild kits include brushes, voltage regulators, and bearings — the parts that wear out first.
Signs Your Alternator Needs Rebuilding
How do you know if your alternator needs a rebuild instead of a full replacement? Watch for these warning signs. Catching them early can save you from a dead battery on the side of the road.
Common Alternator Symptoms
Your car gives you plenty of clues before an alternator completely fails. Here are the most common ones:
- Dim or flickering headlights: Especially at idle or low speeds.
- Battery warning light: This shows up on your dashboard as a battery-shaped icon.
- Electrical accessories acting up: Power windows slow down, the radio cuts out, or your dash lights dim.
- Dead or weak battery: If your battery keeps dying, the alternator may not be charging it properly.
- Strange noises: Grinding or whining sounds from the engine area often mean worn bearings.
- Smell of burning rubber: A slipping serpentine belt or overheating component can produce this smell.
If you notice any of these signs, do not ignore them. A failing alternator can leave you stranded. You can also check whether your car electrical system has other issues by getting a free diagnostic at many auto parts stores.
Testing Your Alternator at Home
You do not need a mechanic to test your alternator. A simple multimeter will do the trick. Here is how:
- Turn off your car and set your multimeter to DC voltage.
- Connect the probes to your battery terminals.
- A healthy battery should read around 12.6 volts with the engine off.
- Start the engine. The reading should jump to between 13.8 and 14.4 volts.
- If it reads below 13.5 volts, your alternator may not be charging properly.
If your test results are low, a rebuild might be all you need. But if the alternator is physically damaged — cracked housing, bent rotor — you may need to replace it entirely.
Tools and Supplies You Will Need
Before you start tearing into your alternator, gather everything you need. Having the right tools makes the job faster and safer. Nothing is more frustrating than stopping halfway through a project because you are missing a wrench.
Essential Tools
- Socket set and wrenches (metric and standard)
- Screwdrivers (flathead and Phillips)
- Multimeter for testing
- Pliers and wire cutters
- Allen keys or hex sockets
- Rubber mallet
- Clean rags and a wire brush
- Safety glasses and gloves
Rebuild Kit Components
A quality alternator rebuild kit typically includes:
- Brush set (front and rear)
- Voltage regulator
- Bearings (front and rear)
- O-rings and seals
- Rotor seal (if applicable)
Make sure you buy a rebuild kit that matches your specific alternator model. You can find the part number on your existing alternator or in your vehicle’s service manual. Brands like Denso, Bosch, and Valeo make reliable kits that work well for most vehicles.
Also, make sure your workspace is clean and well-lit. You are working with small parts and precise components. A cluttered garage will slow you down and increase the risk of losing tiny pieces.
Step-by-Step Alternator Rebuild Process
This is the heart of the guide. Follow these steps carefully, and you will have a working alternator in no time. Take your time and do not rush — precision matters here.
Step 1: Disconnect the Battery
Safety first. Always disconnect the negative battery terminal before working on any electrical component. Use a wrench to loosen the nut and pull the cable off. Tuck it away so it cannot accidentally touch the terminal while you work.
Step 2: Remove the Alternator
Locate your alternator in the engine bay. You will see the serpentine belt wrapped around the pulley. Here is what to do:
- Take a photo of the belt routing before you do anything. You will need this later.
- Release the belt tensioner and slide the belt off.
- Unplug the electrical connector from the back of the alternator.
- Remove the mounting bolts holding the alternator in place.
- Carefully pull the alternator out and set it on a clean workbench.
Keep all your bolts and small parts organized. A magnetic tray works great for this.
Step 3: Disassemble the Alternator
Now comes the detailed work. Here is the general disassembly order:
- Remove the rear cover (usually held by a few screws).
- Take out the brush assembly by removing the retaining clips or screws.
- Remove the voltage regulator.
- Extract the rear bearing.
- Carefully pull the rotor out of the stator.
- Remove the front bearing from the front housing.
Go slow. Use the right size tools to avoid stripping screws or damaging components. If a part feels stuck, do not force it. A penetrating lubricant can help free stubborn parts.
Step 4: Inspect and Clean
With the alternator apart, inspect every component closely:
- Stator windings: Look for burned or discolored wires. If the windings are damaged, a rebuild will not fix it.
- Rotor: Check for bent shaft or worn slip rings.
- Diodes: Test them with a multimeter. Bad diodes mean the alternator needs replacement, not just a rebuild.
- Housing: Check for cracks or severe corrosion.
Clean all components with a wire brush and solvent. Remove all old grease and carbon buildup. Dry everything thoroughly before moving on.
Step 5: Replace Worn Parts
Install the new parts from your rebuild kit. This typically includes:
- Press in the new rear bearing using a socket that matches the bearing inner diameter.
- Install the new front bearing the same way.
- Replace the brush assembly — make sure the brushes move freely in their holders.
- Install the new voltage regulator.
- Replace any O-rings or seals to prevent future leaks.
Take your time with the bearings. They need to seat properly for smooth operation. A little silicone grease on the bearing surfaces helps everything move smoothly.
Step 6: Reassemble the Alternator
Reassembly is basically the reverse of disassembly:
- Slide the rotor back into the stator.
- Reinstall the front housing and secure it.
- Reattach the brush assembly and voltage regulator.
- Put the rear cover back on.
- Reconnect the electrical connector.
Make sure everything sits flush and all bolts are snug but not overtightened. Stripped threads in the alternator housing can cause real headaches.
Step 7: Test Before Reinstalling
This step is critical. Do not skip it. Before putting the alternator back in your car, test it:
- Connect it to a 12-volt power source.
- Spin the pulley with a drill or by hand.
- Use your multimeter to check the output at the terminals.
- You should see 13.5 to 14.5 volts.
If the output is good, you are ready to reinstall. If not, double-check your connections and make sure all new parts are installed correctly.
Step 8: Reinstall and Go for a Test Drive
Put the alternator back in reverse order of removal. Reinstall the serpentine belt using your photo as a reference. Reconnect the battery, start the car, and let it idle for a few minutes. Check that the voltage reads in the normal range. Then take a short test drive to make sure everything works.
For more tips on keeping your car running smoothly, you might also want to read about can a timing chain last 300 to understand other long-term car maintenance topics.
Common Mistakes to Avoid During an Alternator Rebuild
Even experienced DIYers make mistakes. Here are the most common ones to watch out for:
Skipping the Test Before Reinstallation
This is the number one mistake. Putting a rebuilt alternator back in without testing it means you could be chasing the same problem again. Always test before you reinstall.
Using the Wrong Rebuild Kit
Not all rebuild kits are universal. Using the wrong kit means parts that do not fit or perform poorly. Always match the kit to your specific alternator model and vehicle year.
Over-tightening Bolts
Alternator housings are made of aluminum, which strips easily. Use a torque wrench when possible and follow the manufacturer’s specifications.
Forcing Stuck Parts
If a bearing or housing part is stuck, forcing it can crack the housing or damage the rotor. Use penetrating oil and patience instead.
Ignoring Underlying Electrical Issues
Sometimes a dead alternator is a symptom, not the cause. A short circuit or overloaded electrical system can burn out a new alternator quickly. Check your wiring and electrical loads before reinstalling.
When to Call a Professional Instead
Here is the honest truth — not every alternator should be rebuilt at home. Know when to call it quits and bring your car to a professional.
If your alternator has a cracked housing, a damaged rotor shaft, or burned stator windings, a rebuild will not fix the problem. These are signs that the unit needs full replacement. Also, if you are not comfortable working with car electrical systems, there is no shame in calling a mechanic. A professional rebuild or replacement typically costs between $200 and $500, which is still less than buying a new alternator from a dealership.
If you have been searching for reliable car repair guidance, you might also check out can I still drive with a P0171 code for advice on handling other car warning lights and codes.
Another great resource is understanding your car’s overall maintenance needs. Regular car maintenance tips can prevent alternator problems before they start. Things like checking your serpentine belt tension, cleaning battery terminals, and monitoring your voltage output go a long way in extending the life of your alternator and other electrical components.
How Much Can You Really Save?
Let us talk numbers because that is what this is all about. A new OEM alternator typically costs between $300 and $600 at a parts store. Add labor if you go to a shop, and you are looking at $500 to $900 total. A rebuild kit costs $20 to $60. Even if you buy a remanufactured core, the savings are substantial.
Here is a quick comparison:
- New OEM Alternator: $300–$600 plus labor
- Remanufactured Alternator: $150–$300 plus core charge
- DIY Rebuild Kit: $20–$60 plus your time
- Professional Rebuild: $100–$250 for labor and parts
The DIY rebuild saves you the most money, but it requires time and confidence. The professional rebuild is a great middle ground if you want to save money without doing the work yourself.
Also, keep in mind that rebuilding an alternator is a great skill to develop. Once you do it once, you can handle it faster and easier next time. You also gain the confidence to tackle other car repairs on your own.
For other car maintenance questions, you might find value in learning about can you get a free diagnostic on your car, which can help you identify alternator and other electrical issues before they become costly repairs.
Maintenance Tips to Extend Alternator Life
Once you have rebuilt your alternator, you want it to last. Here are some simple tips:
- Check the serpentine belt regularly: A worn belt puts extra strain on the alternator.
- Keep battery terminals clean: Corroded terminals make the alternator work harder.
- Avoid overloading the electrical system: Too many aftermarket accessories can strain the alternator.
- Monitor your voltage: Use your multimeter periodically to check charging output.
- Address warning signs immediately: Do not ignore dim lights or warning indicators.
Taking care of your alternator means taking care of your entire electrical system. A healthy alternator means a healthy car.
Final Thoughts on Rebuilding Your Alternator at Home
So, can you rebuild an alternator at home? Absolutely. With the right tools, a quality rebuild kit, and a little patience, you can save serious money and learn something valuable about your car in the process. It is one of the most rewarding DIY car repairs you can do, and it is simpler than most people think.
Start by testing your alternator to confirm it needs a rebuild. Gather your tools and kit. Follow each step carefully. Test before reinstalling. And most importantly, know your limits. If something does not look right or you feel unsure, a professional mechanic is always there to help.
The next time your car shows signs of alternator trouble, do not panic. You now have the knowledge to tackle it yourself. Save your money, build your skills, and enjoy the satisfaction of a job well done.
Frequently Asked Questions
How long does it take to rebuild an alternator at home?
Most people complete a full alternator rebuild in two to four hours, depending on their experience level and the complexity of the unit. If it is your first time, give yourself extra time and keep a repair manual nearby for reference.
Can I rebuild any alternator at home?
Most standard alternators can be rebuilt at home with a rebuild kit and basic tools. However, some modern alternators with integrated circuits or complex internal designs may be better left to professionals. Always check your vehicle’s service manual for guidance specific to your model.
How much does an alternator rebuild kit cost?
A quality alternator rebuild kit typically costs between $20 and $60, depending on the brand and the components included. This is a fraction of the cost of a new alternator or professional repair, making it one of the best DIY automotive savings available.
Is it better to rebuild or replace an alternator?
Rebuilding is cheaper and more environmentally friendly, but it requires time and mechanical skill. Replacement is faster and often comes with a warranty. If your alternator has severe internal damage like a burned stator or cracked housing, replacement is the better option.
What causes an alternator to fail?
The most common causes of alternator failure include worn brushes, a faulty voltage regulator, bad bearings, and overheated diodes. Electrical overload, a slipping serpentine belt, and age can also contribute to premature alternator wear and failure.
Will a rebuilt alternator last as long as a new one?
Yes, a properly rebuilt alternator can last just as long as a new one, especially if you use quality rebuild kit parts and follow the correct procedures. Many DIYers report their rebuilt alternators lasting over 100,000 miles with proper maintenance.
=== CONCLUSION ===
Rebuilding an alternator at home is one of the smartest moves a car owner can make. It saves you money, teaches you valuable mechanical skills, and keeps your car running strong. With the step-by-step guide above, the right tools, and a quality rebuild kit, you have everything you need to succeed. Start small, follow each step carefully, and enjoy the satisfaction of fixing your car with your own hands. Your wallet — and your car — will thank you.