Harley-Davidson Wiring Diagrams Guide – Everything You Need
The Harley-Davidson Wiring Diagrams Guide is your essential resource for understanding, reading, and troubleshooting your motorcycle’s electrical system. Whether you own a classic Sportster or a modern Road Glide, this guide breaks down wiring colors, symbols, and common electrical problems in simple terms. You will learn how to read schematics, fix frequent wiring issues, and keep your bike running safely and reliably.
Owning a Harley-Davidson is about more than the rumble of the engine. It is about the entire ride, and that includes the electrical system that keeps everything running. Whether you are restoring a classic or maintaining a newer model, understanding your bike’s wiring is critical. This Harley-Davidson Wiring Diagrams Guide gives you everything you need to read, interpret, and use wiring schematics like a pro.
Electrical problems are one of the most common headaches for Harley owners. A flickering headlight, a dead ignition, or a mysterious short can turn a weekend ride into a frustrating experience. The good news is that most of these issues become easy to solve once you know how to read a wiring diagram. This guide walks you through every step in plain language.
We will cover wiring colors, symbols, common problems, and where to find the right diagram for your specific model. By the end, you will feel confident tackling electrical work on your own bike. No guesswork. No expensive mechanic visits for simple fixes. Just clear, practical knowledge you can use right away.
Key Takeaways
- Wiring diagrams are essential: They help you understand your Harley-Davidson’s entire electrical system at a glance.
- Color codes matter: Knowing your wire colors saves hours of troubleshooting time.
- Common issues are fixable: Most Harley wiring problems come down to a few repeatable causes.
- Model-specific diagrams vary: Different years and models have unique wiring layouts you need to match correctly.
- Safety first: Always disconnect the battery before working on any electrical component.
- Free resources exist: You do not need to spend a fortune to find quality wiring schematics.
📑 Table of Contents
- What Is a Harley-Davidson Wiring Diagrams Guide?
- Why Every Harley Owner Needs Wiring Diagrams
- Common Harley-Davidson Wiring Issues and How to Fix Them
- Understanding Harley-Davidson Wiring Colors and Symbols
- Tips for Reading and Using Wiring Diagrams
- Where to Find Reliable Harley-Davidson Wiring Diagrams
- Expert Insights on Harley-Davidson Electrical Systems
- Conclusion
What Is a Harley-Davidson Wiring Diagrams Guide?
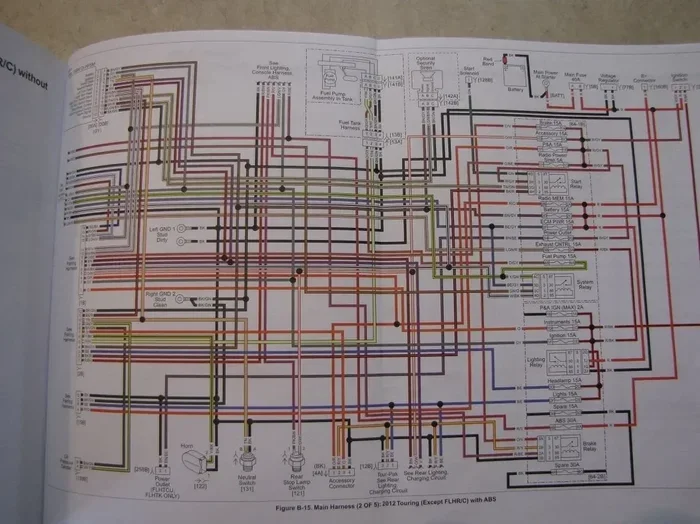
A Harley-Davidson Wiring Diagrams Guide is a visual map of your motorcycle’s electrical system. It shows how every wire, connector, fuse, and component connects to each other. Think of it as a blueprint for your bike’s electrical brain.
These diagrams use standardized symbols and color codes to represent different parts of the circuit. A line might represent a wire. A circle might stand for a ground point. A zigzag shape could indicate a resistor. Once you learn the basic language, the diagrams become much easier to read.
Here is what a typical wiring diagram includes:
- Power source: Shows where electricity comes from, usually the battery or stator.
- Ground paths: Shows where the electrical current returns to complete the circuit.
- Fuses and relays: Protects circuits from overloads and controls power flow.
- Component symbols: Represents lights, switches, ignition coils, and more.
- Wire color codes: Each wire has a specific color that tells you its function.
Harley-Davidson has been building motorcycles for over a century, and their wiring systems have evolved significantly. Older models use simpler wiring with fewer electronics. Newer bikes have complex systems with fuel injection, ABS, and advanced lighting. Your guide needs to match your specific model and year.
Why Diagrams Matter for Harley Owners
Without a wiring diagram, you are essentially guessing. You might swap wires around and hope for the best. But that approach can cause serious damage. A wrong connection can fry a component or even create a fire hazard.
A proper diagram eliminates the guesswork. It shows you exactly where each wire goes and what it does. This is especially important when you are dealing with aftermarket additions like custom lighting or upgraded audio systems. You need to know how your additions will interact with the existing wiring.
For those who also work on other aspects of their bike, understanding electrical basics complements knowledge of other systems. For instance, learning about electrical wiring pairs well with understanding other technical aspects of your ride, such as how 20 Percent Window Tint and other customizations work together with your bike’s overall build. Having a strong grasp of wiring fundamentals makes every other upgrade easier too.
Why Every Harley Owner Needs Wiring Diagrams
Some riders ignore the electrical side of their motorcycle until something goes wrong. That is a mistake. Wiring diagrams serve several important purposes that every Harley owner should understand.
Troubleshooting Made Faster
When something stops working on your bike, a wiring diagram helps you find the problem quickly. Instead of pulling every wire out and testing them one by one, you can follow the circuit path on the diagram. You narrow down the issue to a specific section. This saves hours of frustrating work.
For example, if your headlight goes dim, the diagram helps you trace the circuit from the battery to the headlight. You can check the fuse, the switch, and the ground connection in order. Most dim headlight problems come down to a loose ground or a corroded connector. The diagram tells you exactly where to look.
Planning Upgrades and Mods
Many Harley owners love to customize their bikes. You might want to add LED headlights, a new stereo system, or heated grips. Before you start cutting wires or adding relays, you need to understand your existing wiring layout.
A wiring diagram shows you where you can tap into the electrical system safely. It tells you which circuits can handle additional load and which ones cannot. Without this knowledge, you risk overloading a circuit and blowing fuses repeatedly. A good diagram keeps your upgrades safe and reliable.
Restoring Classic Harleys
If you own a vintage Harley, wiring diagrams are absolutely essential. Older bikes often have degraded wiring that needs complete replacement. You cannot simply copy the old wiring because the insulation is cracked and the connections are corroded.
A wiring diagram gives you the original layout so you can rebuild the electrical system correctly. You match every wire to its proper function. This is especially important for show-quality restorations where authenticity matters. A wrong wire placement can ruin the look and function of a classic bike.
Common Harley-Davidson Wiring Issues and How to Fix Them
Electrical problems on Harleys tend to follow predictable patterns. Here are the most common issues you will encounter and how to address them using your wiring diagram.
Corroded Connectors
Moisture is the enemy of motorcycle wiring. Over time, connectors corrode, especially on bikes that sit outside or ride in wet conditions. Corrosion increases resistance and can cause intermittent electrical failures.
The fix is simple. Disconnect the corroded connector, clean it with electrical contact cleaner, and apply dielectric grease. If the corrosion is severe, replace the connector entirely. Your wiring diagram helps you identify which connector controls which circuit so you do not mix anything up.
Blown Fuses
A blown fuse is the most common electrical issue on any motorcycle. When a fuse blows, the circuit it protects stops working. But a blown fuse is usually a symptom, not the root cause.
Here is what to do when a fuse blows:
- Check your wiring diagram to identify the circuit the fuse protects.
- Look for a short circuit or overloaded component on that circuit.
- Replace the fuse with the correct amperage rating.
- Test the circuit. If the new fuse blows immediately, you have a short that needs fixing.
Never replace a fuse with a higher amperage rating. That is a dangerous shortcut that can cause wires to overheat and start a fire.
Bad Grounds
A bad ground is one of the sneakiest electrical problems. Your Harley-Davidson relies on the frame and engine as ground paths for many circuits. If a ground connection becomes loose or corroded, the circuit does not work properly.
Symptoms of a bad ground include flickering lights, intermittent accessory failures, and erratic gauge readings. Use your wiring diagram to locate the ground points on your specific model. Clean every ground connection with a wire brush and re-secure them tightly.
Wire Chafing and Breaks
Over time, wires can rub against frame members or engine components. This chafing wears through the insulation and exposes the bare copper underneath. Exposed wires can short against the frame or each other, causing all kinds of electrical gremlins.
Inspect your wiring harness regularly, especially in areas where wires pass through tight spaces. Use loom or heat-shrink tubing to protect vulnerable sections. Your wiring diagram helps you trace the full path of each wire so you know exactly where to look for chafing.
Understanding Harley-Davidson Wiring Colors and Symbols
Every wiring diagram uses a color-coding system to identify wires. Learning these colors is one of the fastest ways to become comfortable with motorcycle electrical work. Here is a breakdown of the most common wire colors you will encounter in Harley-Davidson diagrams.
| Wire Color | Typical Function |
|---|---|
| Red | Power supply (battery positive) |
| Black | Ground (negative return) |
| Yellow | Ignition power / accessory power |
| Green | Signal / lighting circuit |
| Blue | Starter relay / auxiliary |
| White | Instrument lighting / neutral |
| Orange | Charging system output |
| Brown | Tail light / running lights |
Keep in mind that wire colors can vary between Harley-Davidson models and production years. Always confirm the color code for your specific model using the official wiring diagram. The table above gives you a general idea, but it is not a substitute for the actual diagram for your bike.
Common Symbols You Will See
Wiring diagrams use a set of standard symbols to represent components. Here are the ones you will see most often on Harley-Davidson schematics:
- Battery: Shown as two parallel lines of different lengths.
- Fuse: A small rectangle or a line with a break in it.
- Switch: A line with a diagonal gap that closes when activated.
- Light: A circle with an “X” or a “+” inside.
- Ground: A series of horizontal lines getting shorter, like a triangle.
- Relay: A coil symbol with a switch contact.
- Connector: A small rectangle with wire leads coming out of it.
Once you recognize these symbols, reading any Harley-Davidson wiring diagram becomes much easier. Practice by tracing a simple circuit, like the headlight circuit, from the battery through the switch to the bulb and back to ground.
Tips for Reading and Using Wiring Diagrams
Reading a wiring diagram for the first time can feel overwhelming. There are lines everywhere, symbols everywhere, and color codes everywhere. Here are some practical tips that will make the process much smoother.
Start Simple
Do not try to understand the entire diagram at once. Pick one circuit and trace it from start to finish. The headlight circuit is a great place to start because it is straightforward and easy to test. Once you are comfortable with one circuit, move on to the next.
Use Highlighters
Grab a pack of colored highlighters. Use one color to trace the power side of the circuit and another color to trace the ground side. This visual separation makes it much easier to follow the path of electricity through the diagram.
Print Large Versions
Small diagrams on a phone screen are hard to read. Print a large copy of your wiring diagram and tape it to your workbench. Having a physical copy lets you mark it up with notes, arrows, and highlights as you work.
Cross-Reference with Your Owner’s Manual
Your Harley-Davidson owner’s manual contains valuable information about fuse locations, relay positions, and connector pins. Cross-reference this information with your wiring diagram for a complete picture of your electrical system.
Quick Tips for Electrical Work
- Always disconnect the battery negative terminal before starting any electrical work.
- Use a multimeter to test voltage and continuity at every step.
- Label every wire and connector before you disconnect anything.
- Take photos of connections before you disassemble them.
- Use dielectric grease on all connectors to prevent corrosion.
- Never splice wires without using proper solder and heat-shrink tubing.
Common Mistakes to Avoid
- Guessing wire functions: Always refer to the diagram. Guessing leads to wrong connections.
- Ignoring ground points: A bad ground causes more problems than most people realize.
- Using the wrong fuse rating: This is a fire hazard and can destroy expensive components.
- Working on a live system: Always disconnect the battery first.
- Skipping connector inspections: Corroded connectors are the number one cause of intermittent electrical failures.
Where to Find Reliable Harley-Davidson Wiring Diagrams
Finding the right wiring diagram for your specific Harley-Davidson model is essential. Generic diagrams may give you a general idea, but model-specific diagrams are what you need for accurate troubleshooting and repairs.
Official Harley-Davidson Resources
Harley-Davidson dealers and service centers have access to official wiring diagrams for every model and year. You can request a copy through your local dealer or through the Harley-Davidson parts website. These official diagrams are the most accurate and up-to-date resources available.
Online Communities and Forums
The Harley-Davidson community is incredibly generous with knowledge. Forums like Harley-Davidson Forums and Reddit’s r/Harley-Davidson often have members who share wiring diagrams and troubleshooting advice. These communities are a great place to find model-specific information and real-world advice from experienced riders.
Service Manuals
Every Harley-Davidson comes with a service manual that includes detailed wiring diagrams. If you bought a used bike without the manual, you can often find digital copies online. The service manual is the gold standard for wiring information because it is published by the manufacturer and covers every system in detail.
For those interested in other aspects of their bike’s customization and maintenance, having a comprehensive understanding of your Harley’s systems is key. Electrical knowledge pairs naturally with other technical skills. Just as you would research proper 20 Percent Window Tint applications for your ride, understanding wiring diagrams helps you make informed decisions about every modification you make.
Aftermarket Wiring Resources
If you are adding aftermarket accessories, many manufacturers provide wiring diagrams for their products. Companies that sell Harley-Davidson-specific accessories often include detailed installation guides with wiring schematics. These resources are invaluable when you are integrating new components into your bike’s existing electrical system.
Expert Insights on Harley-Davidson Electrical Systems
Experienced Harley technicians offer a few insights that can save you time and money when working on your bike’s electrical system.
Start with the simplest explanation. Most electrical problems are not complicated. A loose connection, a corroded ground, or a blown fuse accounts for the vast majority of issues. Do not assume the worst. Check the basics first.
Invest in a quality multimeter. A good multimeter is the most important tool for any motorcycle electrical work. It lets you test voltage, continuity, and resistance quickly and accurately. You do not need an expensive model. Even a basic digital multimeter will serve you well for years.
Keep your wiring harness clean and organized. A messy wiring harness makes troubleshooting nearly impossible. Take time to bundle and secure your wires with proper ties and loom. A clean harness also prevents wires from chafing against sharp edges.
Do not ignore small problems. A flickering dash light or an intermittent turn signal might seem minor. But these small issues often indicate a deeper problem like a corroded connector or a weakening ground. Address them early before they become bigger, more expensive repairs.
Conclusion
The Harley-Davidson Wiring Diagrams Guide is more than just a collection of pictures and lines. It is a powerful tool that empowers you to understand, maintain, and improve your motorcycle’s electrical system. From troubleshooting a dead headlight to planning a full custom build, wiring diagrams give you the knowledge and confidence to get the job done right.
Take the time to learn the symbols, color codes, and circuit paths that are unique to your Harley-Davidson model. Practice tracing circuits and testing connections. With patience and practice, you will find that electrical work on your bike becomes second nature. You will save money, avoid unnecessary trips to the shop, and gain a deeper appreciation for how your motorcycle works.
Remember to always prioritize safety. Disconnect the battery before any work, use the right tools, and never take shortcuts. Your Harley-Davidson deserves the best care you can give it, and understanding the wiring is a big part of that care. Use this guide as your starting point and keep building your knowledge every time you work on your bike.
Frequently Asked Questions
What is a Harley-Davidson wiring diagram used for?
A Harley-Davidson wiring diagram shows you how every electrical component on your bike connects. It helps you troubleshoot problems, plan upgrades, and understand the electrical system. Whether you are fixing a dead light or adding custom accessories, the diagram is your roadmap.
How do I find the wiring diagram for my specific Harley model?
You can find your model-specific diagram through your local Harley-Davidson dealer, the official Harley-Davidson parts website, or your bike’s service manual. Online forums and communities also share diagrams for many popular models. Always confirm the diagram matches your exact model and production year.
What are the most common Harley-Davidson electrical problems?
The most common issues are corroded connectors, blown fuses, bad ground connections, and chafed wires. These problems cause symptoms like flickering lights, dead ignition, and intermittent accessory failures. Most of these issues are easy to fix once you locate the problem using your wiring diagram.
Do I need special tools to read a Harley-Davidson wiring diagram?
No special tools are needed to read a wiring diagram itself. However, a basic digital multimeter is essential for testing the circuits you trace on the diagram. Other helpful tools include wire strippers, crimpers, electrical contact cleaner, and dielectric grease. These tools make the actual repair work much easier.
Can I modify my Harley-Davidson’s wiring for aftermarket accessories?
Yes, but you should always use your wiring diagram to understand the existing circuits first. Never tap into a wire without knowing its function and load capacity. Use proper relays for high-draw accessories and always fuse new circuits at the power source. Following these precautions keeps your bike safe and reliable.
Are Harley-Davidson wiring diagrams the same for all models?
No, wiring diagrams vary significantly between Harley-Davidson models and production years. A Sportster from the 1970s has a very different wiring layout than a modern Road Glide. Always use the diagram that matches your specific model, engine type, and year to ensure accuracy.
=== META TITLE ===
Harley-Davidson Wiring Diagrams Guide – Everything You Need
=== URL SLUG ===
harley-davidson-wiring-diagrams-guide
=== SEO TITLE ===
Harley-Davidson Wiring Diagrams Guide – Everything You Need